How to Decorate Tall Walls November 24 2015

Whether they are in a foyer, your family room, or even a bedroom, the soaring ceiling that come with tall walls look fantastic and create such an open, airy feeling to your home, but when it comes to decorating the adjacent walls, most people are left scratching their heads. Thankfully, we found some tips on what to and not to do when decorating those walls that go on forever.

- Use large scale art -- Gallery walls and oversized art are probably the most common solution to fill up those tall walls. A large grouping of art or photographs are a great way to fill up the space.
- Add trim -- Adding trim to your wall is also a great way to break-up the vastness of those soaring, double height walls often found in Foyers and great rooms.
- Use color and texture -- Here, panels of trim are filled with grasscloth. Printed wallpaper would also look great and create the feel of an art piece.
- Hang a mirror -- Mirrors are a great alternative to hanging art. Try a large oversized mirror, or a grouping of smaller mirrors.
- Install shelving -- If you are a book lover, consider adding some custom library shelves and make that open space functional.
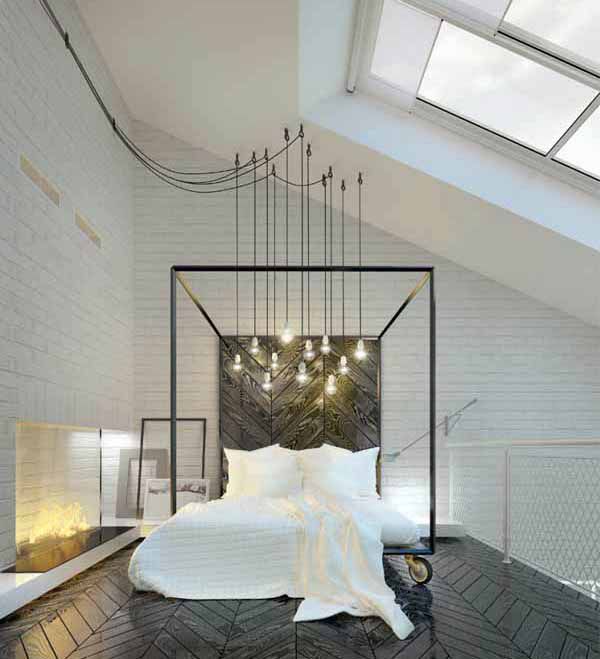
- Distract -- And lastly, a great way to sole the big empty wall syndrome is to distract the eye AWAY from the wall by adding dramatic floor to ceiling curtains, or an oversized light fixture.
Source: Sarah Langtry, Bloglovin',
17 Ways to Make Your Bed the Comfiest Place on Earth November 24 2015

Make your bed even harder to get out of in the morning with these little tricks we found:
- Hang string lights above your bed to create a magical look.
- Dress your bed in a giant sweater with a cable-knit blanket.
- Get a real down comforter.
- Skip the top sheet and put a nice, washable duvet cover on your comforter.
- Throw down an extra fuzzy bedside rug to make things easier for your feet in the morning.
- A plushy, faux-fur throw on top of your bed covers will add Hollywood glam to your all-day Netflix sessions.
- Tuck your covers in neatly.
- Make your bed every day.
- Add pillows!
- With basic sewing skills, transform a new bath mat or accent rug into a cuddly throw pillow cover.
- Invest in a bedside lamp so you don't have to get up to turn off the overhead light.
- Save money on a fancy, tufted headboard by creating your own.
- Try linen sheets instead of cotton. They aren't cheap, but they get better and softer the more you sleep in them and last you for years.
- DIY a cozy canopy by hanging fabric from the ceiling. Option 1 for creating this canopy is to buy wooden dowels for just a few cents at a craft store and attach them to the ceilings with hooks or thumbtacks. Option 2 is to rig up two short curtain rods on either side of the bed. Both options are very affordable and add an elegant look to any bedroom.
- Add a foam or feather pillow-top pad to your mattress to make it softer.
- If your bed is in a nook or a particularly small room, turn it into a ship-shape hideaway with some curtains.
- Find someone furry to share a bed with. Puppies and kittens are the solution to almost any problem.

Source: Rachel Sanders, Buzzfeed.
How to Design a Photo Gallery Wall November 24 2015

Wall galleries look simple, but they are not an easy task. We found an article that breaks the process up into steps that will result in a beautiful, slightly offbeat but still balanced wall full of photos and prints that mean the most to you.
-
Selecting photos and frames -- Choose a theme and/or a common color palette as a guiding force in your selection process. Remember that displaying simpler images in large scale and more detailed/complex images in small scale results in a more pleasing, less cluttered layout.
-
Designing the layout -- Remember that achieving the asymmetrical-but-balanced look is easier said than done, and it will take a lot of patience.
-
Defining the dimensions -- Start by placing tape on the wall to define the outer boundaries of the photo area so that you can design an arrangement that works well within the available dimensions of the wall.
-
Arranging and re-arranging -- Place all of your framed photos on the floor in the same relative dimensions as the outer boundaries and then experiment (over and over again) with different layouts. It is even okay to eliminate a couple of photos and add some new ones. Give yourself time to get used to the layout before attaching it on the wall to make sure that you really like it.
-
Documenting the layout -- Once you have an arrangement that you are set on, document the overall layout by taking a panoramic photo on your phone (which is easy to do with the iPhone camera app.) Take detailed shots of smaller sets of groupings. The panoramic image allows you to remember the layout of the photos, while the details hots allow you to see the specific alignment of the one image to its neighboring image. To maintain a sense of order, pay close attention to the alignment of the frames and the spacing between them. Different sized frames cannot be consistently aligned or have consistent spacing throughout the overall layout, so work in small groupings and make mini arrangements of consistent alignment and spacing. Remember to have fun with it!
-
Installing on the wall -- When you are ready to transition the photos to the wall, start in the center of the collage, where the largest images are, and work your way out from there. Use the detail photos on your phone to ensure that the alignment of the frames and the general spacing between them are matched up. 3M picture hanging strips are useful for most of the installing process, except for particularly large frames. These will help you hold a picture in the approximate position while using a tape measure to ensure the correct distance from the neighboring frame to make sure it is straight. Press the frame to the wall when it is ready.
-
Remember that this is not the easiest nor the fastest process, but it is something that you will be sure to enjoy for many years to come. Put in a little patience with your work, and it will be worth it.


Source: Julee, warmhotchocolate.com.
8 Ways to Fill Your Home with Positive Energy November 24 2015
- Hang a Hamsa -- In many cultures, the hamsa (sometimes called the Hand of Fatima) is believed to defend against the evil eye.
- Decorate with Pyrite -- Pyrite is oftentimes said to create a defensive shield against negative energies, environmental pollutants, and emotional and physical attacks. Try including some pyrite on a book shelf or as a paperweight to bring not only the positivity, but the bling, into your abode.
- Burn sage -- Throughout history, people from many different places and cultures have burned white sage to enhance positive energy, cleanse living spaces, and invite protection into the home. "Sage" is Latin is "salvia," which means "to heal."
- Spray sage, too! -- When you purchase items and bring them into your home, spray them with sage spray to cleanse the items of any negative energy they may carry into your home.
- Add lucky leaves -- According to the principles of feng shui, a lucky bamboo plant sttracts auspicious chi energy. Try placing your own near your front door and bunching some sticks together in a vase for even more good vibes.
- Turn on a Himalayan Salt Lamp -- Salt lamps attract humidity and when heated with an incandescent bulb, it accelerates evaporation, which produces negative ions which combats air pollutants. It sounds complicated, but basically, they're really beneficial to you. The light produced by the lamps is also said to increase relaxation, and decrease stress. They're pretty, too!
- Burn Frankincense -- Frankincense promotes calm and peace. It's used to relieve stress and anxiety. Incense sticks and essential oils are helpful, too.
- Add Jasmine -- The smell of jasmine is thought to help with matters of both love and friendship, and can help bring out people's inner-beauty. The Dyptique home scent is a particular favorite to many, but you can try using jasmine in stick or essential oil form as well.

Author: Justina Blakeney
Decorate Your Rental Space November 24 2015

- If your landlord allows you to install shelves (or if they’re already installed), that’s a good way to display pictures, artwork, and other items. This does require making a few holes in the wall, but not nearly as many as if you mounted each piece individually. Shelving also allows you to rotate displays.
- You’re probably not allowed to paint the walls, but no one’s stopping you from painting your furniture! A new coat of paint on a table, dresser, or bed can bring the pop of color you’ve been craving.
- Ugly carpet or damaged wood/linoleum can be covered with a tasteful rug. Adds color and style to an otherwise dull apartment.
- Make use of bookcases because they are great for storing a variety of items and require no hole-making installation. You can even make a coat hanger out of a tall bookshelf by taking out the top shelves and installing hooks. Pictures and artwork can also be displayed on bookshelves, as well as dressers, desks, and armoires.
- Add curtains and valances to the windows using spring-rods that don’t have to be screwed in.
- Easels are another good way to display pictures without damaging the walls.
- Hanging tools that don’t cause as much damage as nails: 3M hanging products, putty, tacks, tape, Velcro
Find the full article and more photos at http://howtobuildit.org/2013/10/09/tips-for-decorate-rental-spaces/2/.
5 Tips For Creating The Perfectly Curated Home November 24 2015

Creating a curated home:
- Listen to your gut - If you see something that makes your heart melt, buy it.
- Know what you like - Use blogs and magazines as a tool to study what you like and what you don’t like.
- Have little moments - You don’t have to cram all of the unique accessories on the bookshelf – find unexpected spots for them. These random details in our living room make me smile.
- Leave your comfort zone - A unique space is created by mixing high and low end items. If you’re on a low budget but can squeeze in a splurge here and *maybe* there, then do it!
- Let your home welcome you - Filling your home with pieces that you love will in turn make the space feel complete and unique to you.
Find the full article and photos at: http://clairebrodydesigns.com/creating-a-curated-home/.
How To Make Your Home Look More Expensive in a Dime November 24 2015

Who doesn't love the elegant look that many upscale homes so successfully have? Have you wished you had more of a staged, organized look? Search no further, because we have found the top ten tips to creating an elegant look in your own home thanks to Meredith from artsandclassy.com.
- Flowers
- Hang curtains high
- Paint your walls
- Area rugs
- Custom window shades
- Switch out lamp shades
- Create vignettes
- Use matching containers for storage
- Replace crappy hardware
- Use vertical space wisely
Source and full article: Meredith, Arts & Classy.
10 Ways to Make Your Home Unique November 23 2015

Add personality and fun to your home with these 10 out-of-the-box home decoration ideas:
- Add bright pops of color to your kitchen
- Create hanging art from recycled plastic
- Fun living room chairs
- Wine cork bathmat
- Lightbox chair
- Oddly shaped chairs
- Canopy tent bed
- Colorful doors
- Bench artwork
- Skylight
Source: Buzzfeed
9 Tips for Hanging Wall Art Above a Sofa November 13 2015

There are multiple factors that affect how exactly to hang a piece of artwork above a sofa, such as the size of the sofa or the art itself. The height of the ceiling, the space available and even personal preference also all have an impact on how it looks. Following tips will help you to create the balanced look that you wish to achieve in order to make your interior decoration flow well and be visually stunning
- Have twice as much space above the art as below it.
- There should be at few inches from top the of the couch to the bottom of the artwork.
- Raising artwork to high above a piece of furniture can make the gap too obvious and seem awkward.
- Make sure there is a sense of unity between the art and the couch so that it does not look like it is floating alone on the wall.
- Pay attention to scale to create an overall cohesive look.
- Wall art that is two thirds the length of a couch is most visually pleasing to the eye.
- Typically wall art that is anywhere between 50% - 90% the length of the couch looks best. The perfect medium is an even 75%.
- Try not to hang artwork that is longer than the length of a couch because this creates an unbalanced look causing an unappealing top heavy appearance.
- Whether you are hanging one large piece or several small pieces paying attention to scale is important in achieving the most aesthetically pleasurable look.
Following these basic measurements will create a unified slick look for your room. Be sure to only change any measurement to better compliment your specific room dimensions.
5 Tips for Hanging Vertical and Horizontal Frames Together August 31 2015

Often times when hanging multiple pictures that are both vertical and horizontal you can end up with awkward positioning and strange gaps left between. But if you choose to follow these rules you will not have to face the confusion of deciding which combinations look best.
- Larger pictures should go on top above smaller images. This creates a smooth equal weight look.
- Always align horizontally from the top and vertically from the middle. This makes a cross balance that creates an equal look and the aligned rows create a visually calming vibe.
- Create an imaginary perimeter where you want your group of photos to be and hang them so the outer edges touch upon the established perimeter. Plan out the matting and framing before you set your perimeter so you can properly lay out the format you plan on using.
- For a more eccentric look you can imagine a oval or loose circle as your perimeter. This works well if you are trying to cover a wide space.
- Group out the photos on the ground before you hang them to make sure you choose the right format for you.
- Our photo is an example of balancing two horizontals by placing the vertical in the center. Keeping the grouping together in a balance.